Send An Invoice For The Draft Order using Postman is the topic we will discuss today. To complete the customer purchase process, you need to send an invoice for the draft order and accept payment after the customer has paid.
After creating the draft order, you can send an invoice in 2 ways:
– Send your customer an invoice containing the checkout link to the checkout page.
– Share the checkout link with your customer through the mobile app.
In this article, Beehexa will show you the first way: Send an invoice containing the checkout link to the checkout page for your customer using Postman in Shopify API.
When you send an invoice for the draft order to your customer, you will meet 2 cases:
– The draft order you created contains customer information: Mail and address. In this case, you must send your customer a default invoice for the draft order.
– The draft order you created does not contain customer information: Mail, address. In this case, you must send your customer the customized invoice for the draft order.
Today, Beehexa will show you how to send an invoice for the draft order in 2 cases.
Let’s explore how to send an invoice for The Draft Order Using Postman in the article.
Note: Any draft orders marked as paid will not be invoiced to the customer.
Table of Contents
Send A Default Invoice
As mentioned above, when the draft order contains customer information, you need to send a default invoice for your customer. Follow the steps below to learn how to do it.
Step 1: Generate API Credentials From The Shopify Admin
If this is the first time you make a call in the Postman, you must generate API credentials from the Shopify admin. Follow the process of How to build a custom app for Shopify in 2022? To know how to access Shopify API.
-
- After creating an app, you must assign “Draft orders” scopes to the admin API scopes.
-
- Remember the Admin API access token and the API key to create a draft order in the Postman.
Step 2: Send A Default Invoice For The Draft Order Using Postman
Before sending a default invoice, you need to get the draft order ID because the send invoice call contains the ID of the draft order.
-
- In the admin dashboard, choose Orders.
-
- Then click on Drafts, and select the draft order you want to send a default invoice.
-
- Finally, copy the draft order ID in the URL
Example: The #D68 draft order ID = 878336999487
Now, we are ready to send a default invoice for the draft order using Postman.
-
- Log in to your Postman and create a new workspace
-
- Create a new POST with this URL:
https://{API_key}:{admin_API_access_token}@{shop}.myshopify.com/admin/api/{api-version}/{resource}.json
-
- {API_key} – The API key that you generated.
-
- {admin_API_access_token} – The admin API access token that you generated.
-
- {shop} – The name of your development store.
-
- {api-version} – The supported API version that you want to use.
-
- {resource} – A resource endpoint from the REST Admin API.
Or you can copy this example in the Shopify Admin, remember to change {resource} to {draft_orders/draft_order_id/send_invoice}:
https://ed86d512a2c95387ffa25f67074a222b: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@hexasync.myshopify.com/admin/api/2021-10/draft_orders/878336999487/send_invoice.json
-
- Paste the URL above.
In the body section, click raw → Choose JSON, then enter the code
{
    "draft_order_invoice": {}
}
Then click Send
Response:
The API will return the data like this.
{
    "draft_order_invoice": {
        "to": "hoai.lam@beehexa.com",
        "from": "crm@beehexa.com",
        "subject": "Invoice #D68",
        "custom_message": "",
        "bcc": []
    }
}

Step 3: Verify the result
In the admin dashboard, go to the orders → Click on drafts
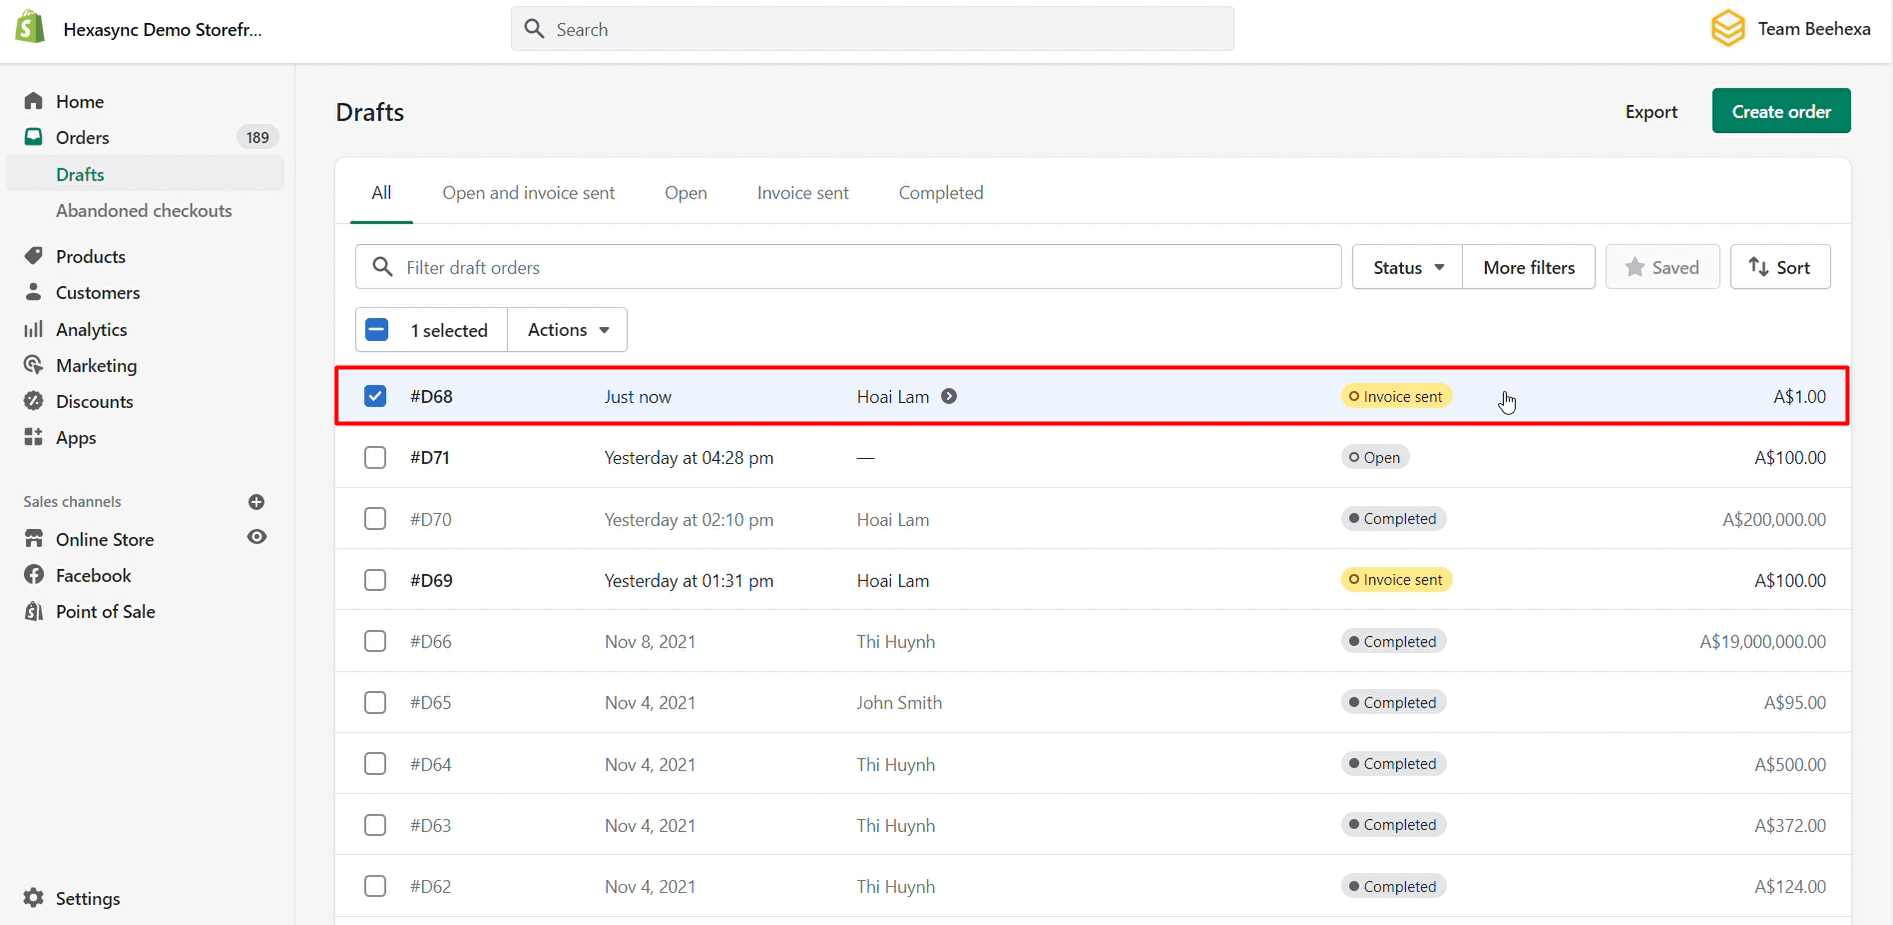
As you can see, the draft order has been sent an invoice successfully.
Send A Custom Invoice
When the draft order doesn’t contain customer information, you need to send a custom invoice for your customer. Follow the steps below to learn how to do it.
Step 1: Generate API Credentials From The Shopify Admin
If this is the first time you make a call in the Postman, you must generate API credentials from the Shopify admin. Follow the process of How to build a custom app for Shopify in 2022? To know how to access Shopify API.
-
- After creating an app, you must assign “Draft orders” scopes to the admin API scopes.
-
- Remember the Admin API access token and the API key to create a draft order in the Postman.
Step 2: Send A Customized Invoice For The Draft Order Using Postman
Before sending a customized invoice, you need to get the draft order ID because the send invoice call contains the ID of the draft order.
Example: The #D71 draft order ID = 878550614079
We are ready to send a customized invoice for the draft order using Postman.
-
- Log in to your Postman and create a new workspace
-
- Create a new POST with this URL:
https://{API_key}:{admin_API_access_token}@{shop}.myshopify.com/admin/api/{api-version}/{resource}.json
-
- {API_key} – The API key that you generated.
-
- {admin_API_access_token} – The admin API access token that you generated.
-
- {shop} – The name of your development store.
-
- {api-version} – The supported API version that you want to use.
-
- {resource} – A resource endpoint from the REST Admin API.
Or you can copy this example in the Shopify Admin, remember to change {resource} to {draft_orders/draft order_id/send_invoice}:
https://ed86d512a2c95387ffa25f67074a222b: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@hexasync.myshopify.com/admin/api/2021-10/draft_orders/878550614079/send_invoice.json
-
- Paste the URL above.
In the body section, click raw → Choose JSON, then enter the code
{
    "draft_order_invoice": {
        "to": "hoai.lam@beehexa.com",
        "from": "crm@beehexa.com",
        "bcc": ["crm@beehexa.com"],
        "subject": "shirt Invoice",
        "custom_message": "Thank you for ordering!"
    }
}
Note: You must have a customer email to enter the code in the body section.
Then click Send
Response:
The API will return the data like this.
{
    "draft_order_invoice": {
        "to": "hoai.lam@beehexa.com",
        "from": "crm@beehexa.com",
        "subject": "shirt Invoice",
        "custom_message": "Thank you for ordering!",
        "bcc": [
            "crm@beehexa.com"
        ]
    }
}

Step 3: Verify the result
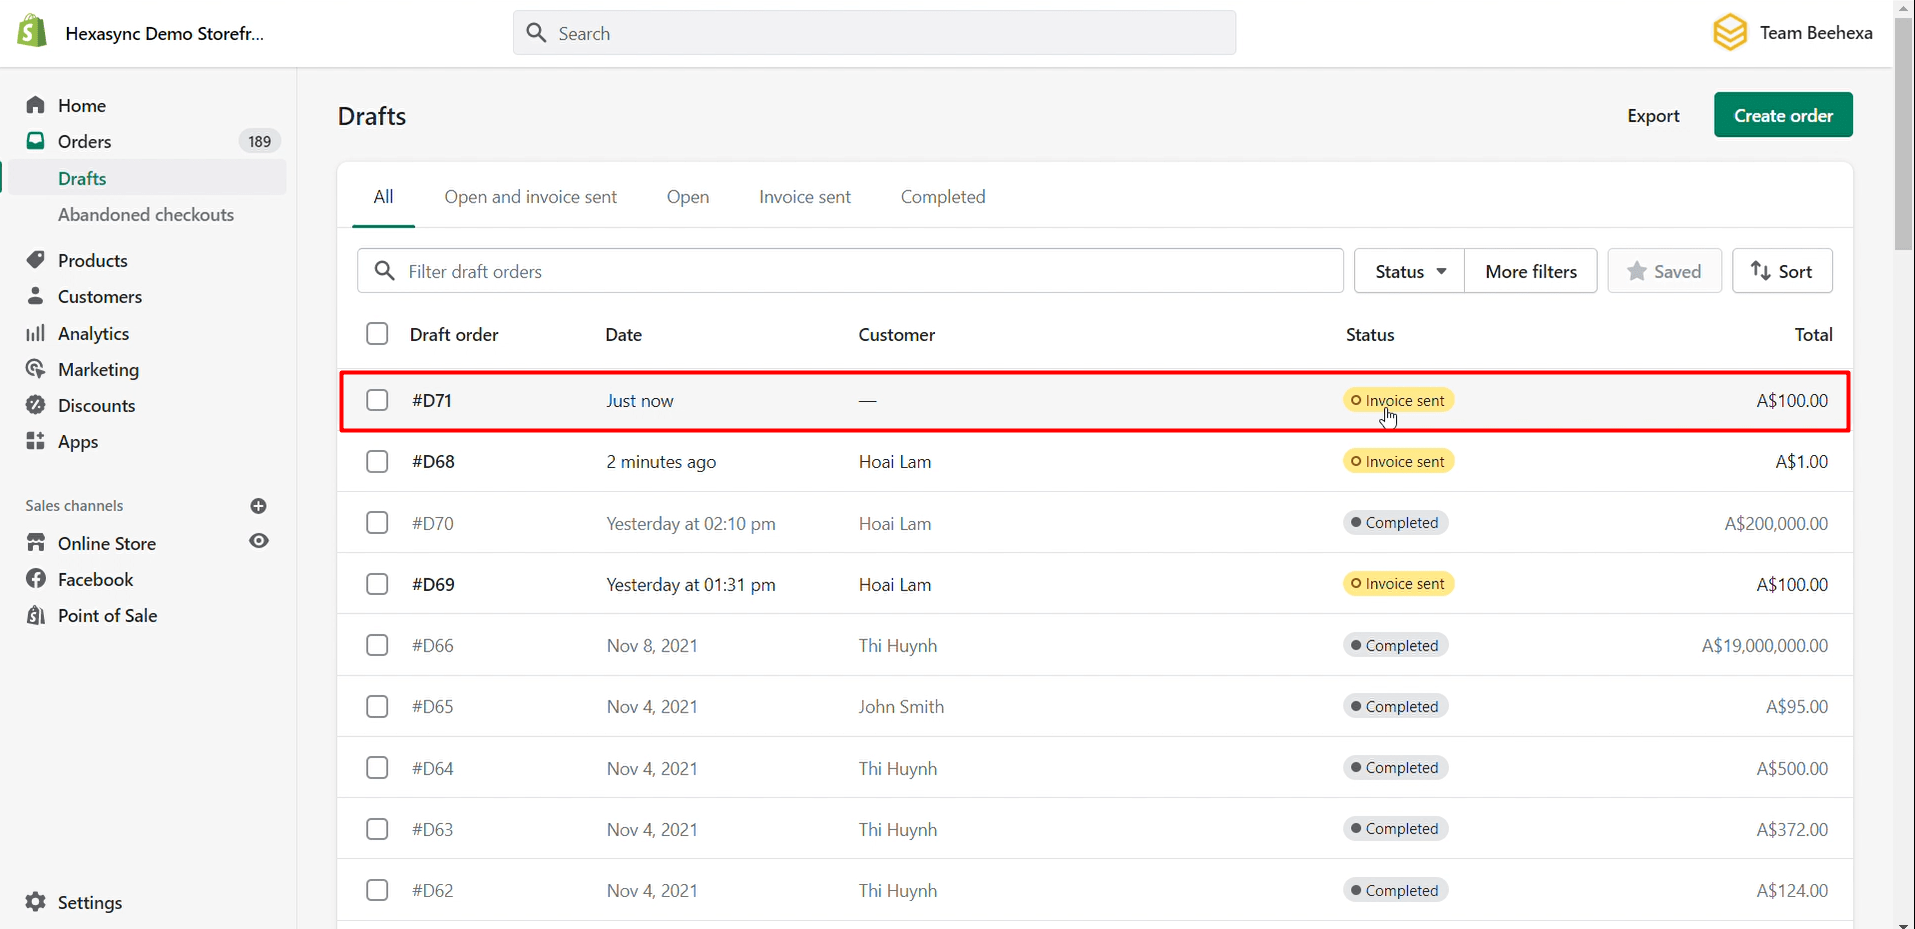
In the admin dashboard, go to the orders → Click on drafts
As you can see, the draft order has been sent an invoice successfully.
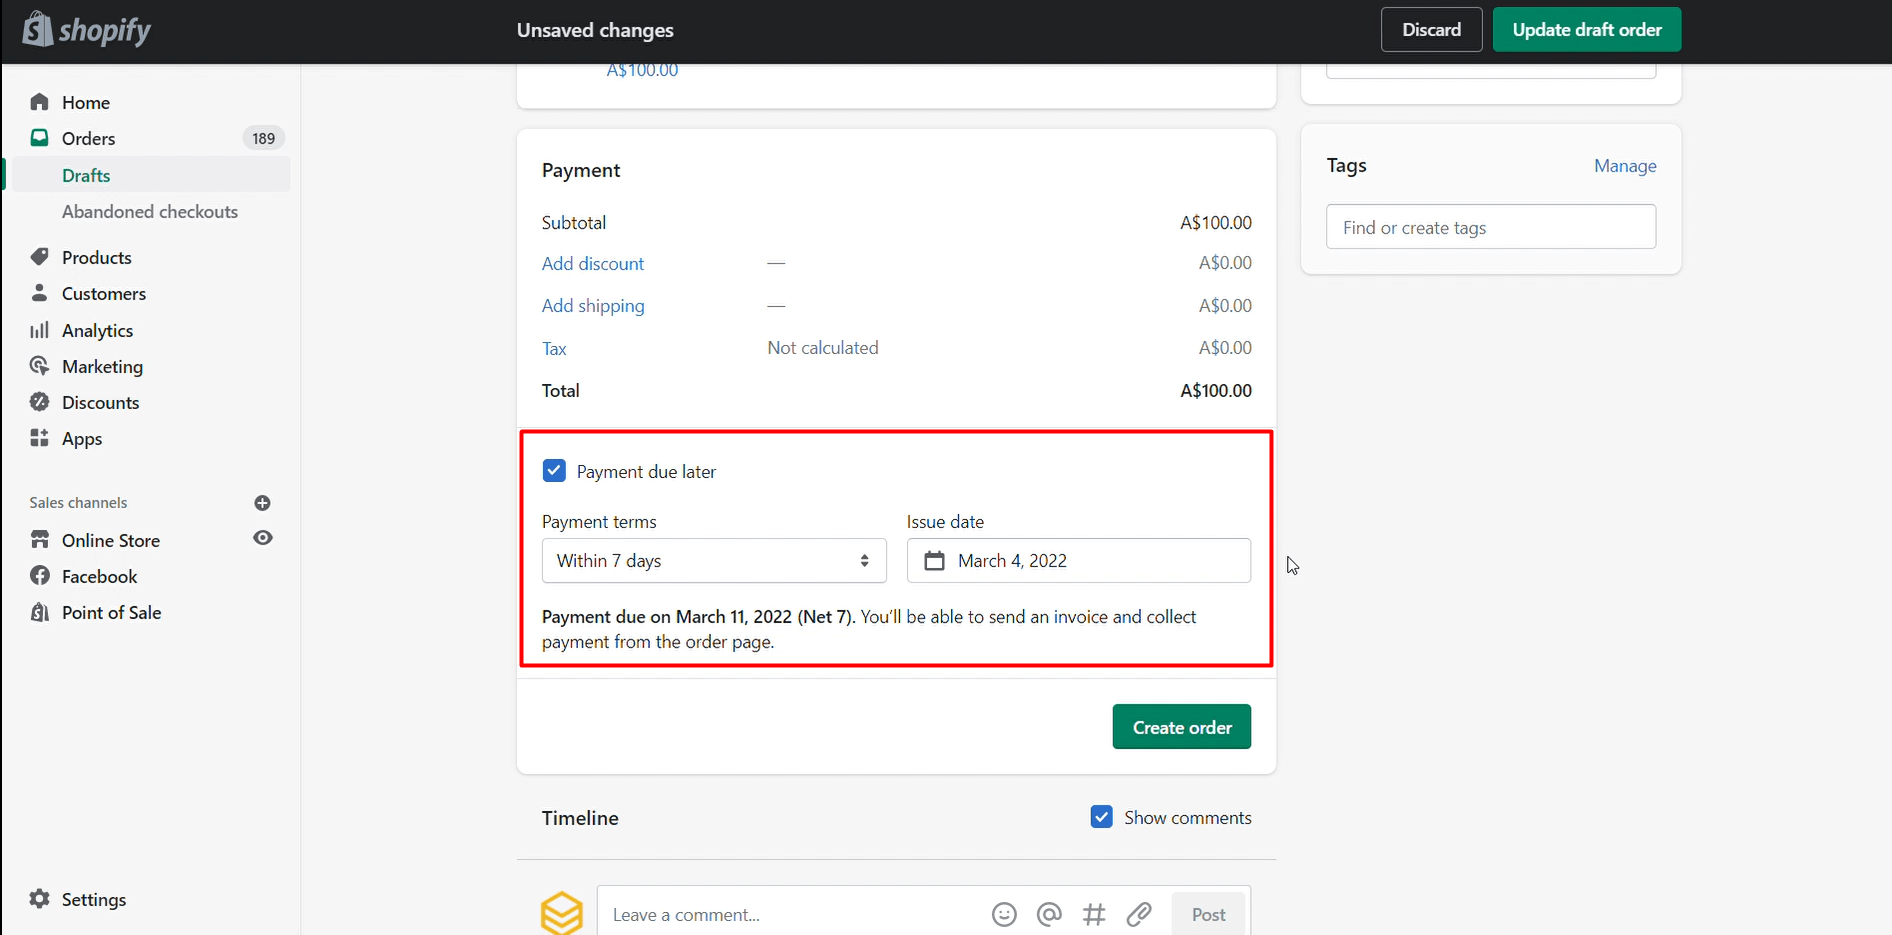
After sending the invoice for the draft order, you can make due the invoice later by going to orders, choosing drafts, click on the draft order you just sent the invoice. Then scroll down to the payment area. Click on the payment due later; after that, you can customize the payment term that suits your business.
Hexasync
After the customer pays and the owner accepts payment, the draft order will automatically change to the order on the order page. This order will be easy to manage with one selling channel. But if you have a lot of orders from different multiple sell channels, you will waste a lot of time and money to manage it: Check order information and revenue,… from each channel one by one.
Thanks to Hexasync, all information about products will be synchronized. You look at all product information on one channel.
Hexasync will save your business a lot of resources from time to money, and you can completely customize Hexasync’s integration solutions to suit your business.
Final words
Above are all steps to send an invoice for the draft order with Shopify API. Please comment below or refer to our Shopify API documentation if you have any questions.
If you still do not understand the tutorial’s content, you can watch the video below for a more overview.
Hopefully, you can do it!


