Table of Contents
What is Magento 2 integration?
In computer science, “integration” is a term that is commonly used when an application needs to interact with other applications to transfer data or trigger an action.
However, in Magento 2, integration is a definition for a third-party application that uses OAuth for authentication. It allows developers or administrators to define which resources (such as customers, orders, or catalogs) the application can access.
As a Magento merchant, you can use the Magento back-end to create an integration manually or build a custom in Magento 2 extension to create that integration programmatically.
Create an integration in Magento 2 manually
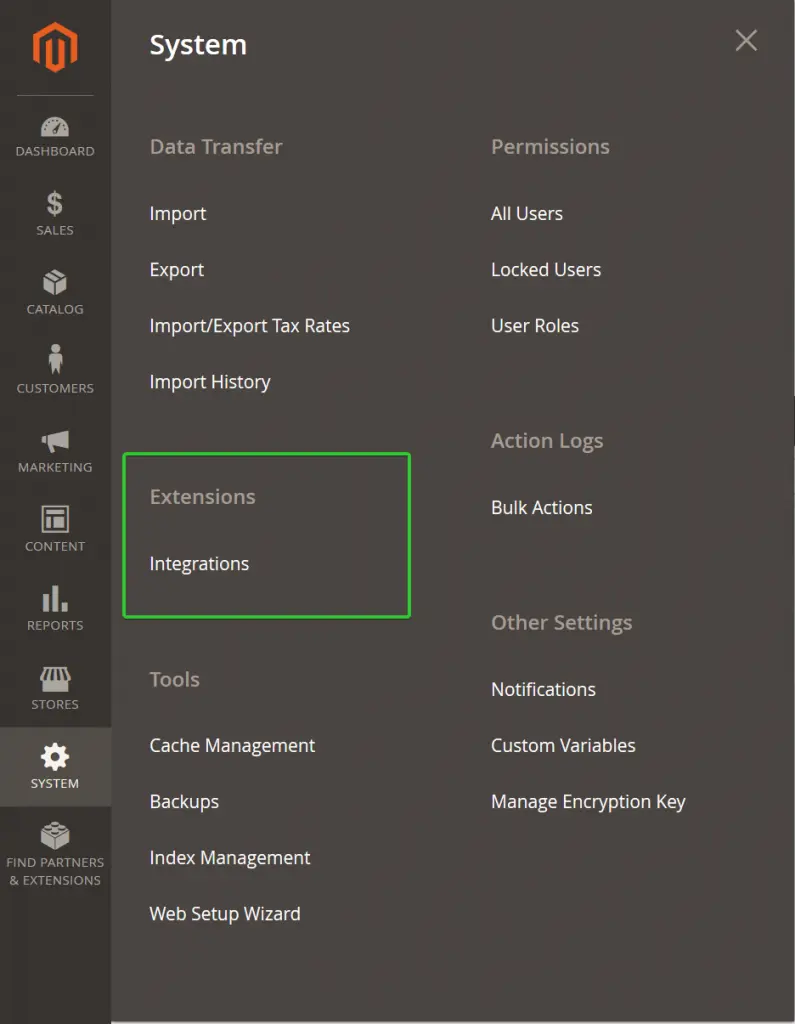
Step 1: Go to System -> Integrations Menu.
Step 2: Click add new integration to open a new integration form.
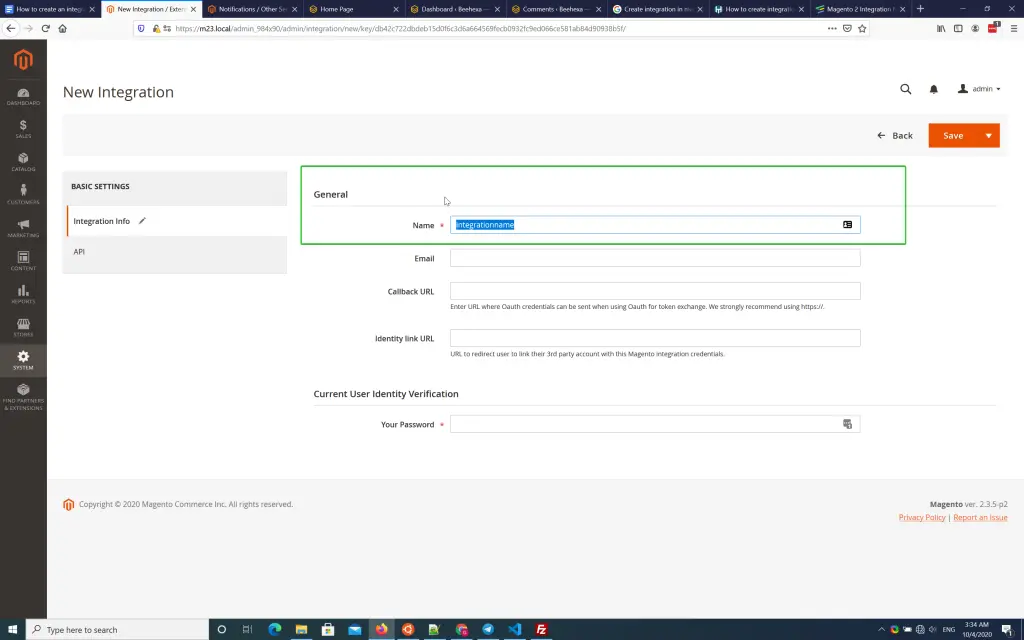
Step 3: Enter the integration name as the form in the above picture.
Step 4: Grant access to the API resources.
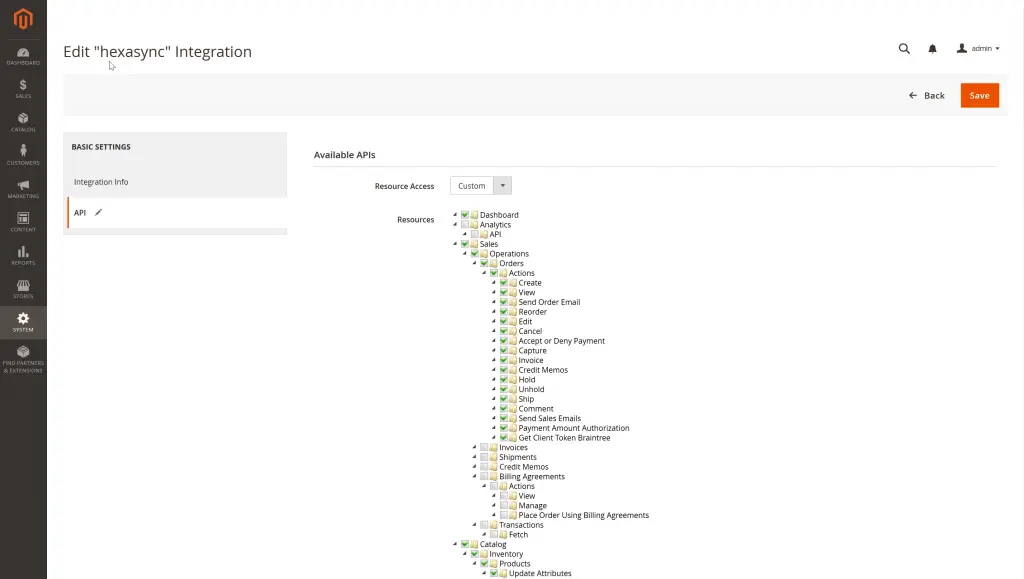
Step 5: Save to create a new consumer public & secret keys for integration.
Step 6: Activate integration for creating an access token for the external application.

After activating, we can see the integration detail in the picture below.

After being generated, the access token can be used by any API test tool (such as Swagger or Postman) or any third-party application. Our HexaSync Integration Platform used the same method for integrating Magento 2 eCommerce websites with ERP systems like Acumatica and Infor CloudSuite Industrial.
The example below is a simple API request for retrieving all the subcategories under the default root category of the Magento 2 sample database.
curl -X GET "https://{{your_magento_url}}/rest/all/V1/categories?rootCategoryId=2&depth=1" -H "accept: application/json" -H "Authorization: Bearer 9qe33ln9ff7xfpkkzkat9tq2ekbx13cy"Code language: JavaScript (javascript)The JSON response data:
{
  "id": 2,
  "parent_id": 1,
  "name": "Default Category",
  "is_active": true,
  "position": 1,
  "level": 1,
  "product_count": 1181,
  "children_data": [
    {
      "id": 64,
      "parent_id": 2,
      "name": "What's New",
      "is_active": true,
      "position": 1,
      "level": 2,
      "product_count": 0,
      "children_data": []
    },
    {
      "id": 46,
      "parent_id": 2,
      "name": "Women",
      "is_active": true,
      "position": 2,
      "level": 2,
      "product_count": 0,
      "children_data": []
    },
    {
      "id": 37,
      "parent_id": 2,
      "name": "Men",
      "is_active": true,
      "position": 3,
      "level": 2,
      "product_count": 0,
      "children_data": []
    },
    {
      "id": 3,
      "parent_id": 2,
      "name": "Gear",
      "is_active": true,
      "position": 4,
      "level": 2,
      "product_count": 46,
      "children_data": []
    },
    {
      "id": 9,
      "parent_id": 2,
      "name": "Training",
      "is_active": true,
      "position": 5,
      "level": 2,
      "product_count": 6,
      "children_data": []
    },
    {
      "id": 7,
      "parent_id": 2,
      "name": "Collections",
      "is_active": false,
      "position": 5,
      "level": 2,
      "product_count": 13,
      "children_data": []
    },
    {
      "id": 55,
      "parent_id": 2,
      "name": "Promotions",
      "is_active": false,
      "position": 6,
      "level": 2,
      "product_count": 0,
      "children_data": []
    },
    {
      "id": 63,
      "parent_id": 2,
      "name": "Sale",
      "is_active": true,
      "position": 6,
      "level": 2,
      "product_count": 0,
      "children_data": []
    }
  ]
}Code language: JSON / JSON with Comments (json)
Create integration in Magento 2 programmatically
Magento 2 manages integrations under the Magento_Integration module.
By using MagentoIntegrationModelConfigBasedIntegrationManager class, we can create an integration with XML configuration files. It takes three main steps to get this process done.
Creating a skeleton Module
Step 1. Create the module file structure.
Like any other Magento 2 custom modules, The module for integration should be placed under magento_base_dir/app/code/{{vendor_name}}/{{module_name}} or under the magento_base_dir/vendors/ folder. In this example, we will place source code under. To make it simple, let’s create under /app/code/{{vendor_name}}/{{module_name}} by running these commands.
cd
mkdir -p app/code//{{vendor_name}}/{{module_name}}/etc/integration
mkdir -p app/code//{{vendor_name}}/{{module_name}}/Setup
Code language: JavaScript (javascript)
Note: In this post, we will use Beehexa as the vendor and IntegrationManager as the module name.
Step 2. Define your module configuration file etc/module.xml
The etc/module.xml the file provides basic information about the module. Change directories to the etc directory and create the module.xml file. We must specify values for the following following information:
- Module name
- Module version
- Dependencies
<!--?xml version="1.0"?-->
Code language: HTML, XML (xml)
Because in the install script that we are going to add later in this tutorial, we call a class name MagentoIntegrationModelConfigBasedIntegrationManager. We have to add Magento_Integration
a dependency for our custom integration creator.
Step 3. Add your module’s composer.json file
Composer is a dependency manager for PHP. You must create a composer.json file for your module so that Composer can install and update the libraries your module relies on. Then place the composer.json file in the module’s root directory.
{
    "name": "beehexa/integrationmanager",
    "description": "",
    "type": "magento2-module",
    "version": "1.0.1",
    "license": [
      "MIT"
    ],
    "autoload": {
      "psr-4": {
        "Beehexa\IntegrationManager\": ""
      },
      "files": [
        "registration.php"
      ]
    }
  }Code language: PHP (php)
For more information, see Create a component from the official Magento development documentation.
Step 4. Create a registration.php file
The registration.php registers the module with the Magento system. It must be placed in the module’s root directory.
MagentoFrameworkComponentComponentRegistrar::register(
    MagentoFrameworkComponentComponentRegistrar::MODULE,
    'Beehexa_IntegrationManager',
    __DIR__
);Code language: PHP (php)
Step 5. Create an install class that will create integration when the module is installed
Change directories to your Setup directory. Create a InstallData.php file that installs the integration configuration data into the Magento integration table.
namespace BeehexaIntegrationManagerSetup;
use MagentoFrameworkSetupModuleContextInterface;
use MagentoFrameworkSetupModuleDataSetupInterface;
use MagentoIntegrationModelConfigBasedIntegrationManager;
use MagentoFrameworkSetupInstallDataInterface;
class InstallData implements InstallDataInterface
{
    /**
     * @var ConfigBasedIntegrationManager
     */
    private $integrationManager;
    /**
     * @param ConfigBasedIntegrationManager $integrationManager
     */
    public function __construct(ConfigBasedIntegrationManager $integrationManager)
    {
        $this->integrationManager = $integrationManager;
    }
    /**
     * {@inheritdoc}
     */
    public function install(ModuleDataSetupInterface $setup, ModuleContextInterface $context)
    {
        $this->integrationManager->processIntegrationConfig(['testIntegration2']);
    }
}Code language: PHP (php)
The InstallData script above will read data from some XML configuration files then adding the integration into Magento.
Adding Integration xml setting files
Magento provides the Integration module, which simplifies the process of defining your integration. This module automatically performs functions such as:
- Managing the third-party account that connects to Magento.
- Maintaining OAuth authorizations and user data.
- Managing security tokens and requests.
There are 2 files those
Magento_Integration module can read for processing Integration settings programmatically.
-
etc/integration/api.xmlfor Define the required resources and; -
etc/integration/config.xmlfor Defining an Integration
Define the required resources
The
etc/integration/api.xml file defines which
API resources the integration has access to.
To determine which resources an integration needs access to, review the permissions defined in each module’s
etc/acl.xml file.
In the following example, the test integration requires access to the following resources in the Sales & Catalog modules:
<integration name="testIntegration2">
	<resources>
		<!-- To grant permission to Magento_Log::online, its parent Magento_Customer::customer needs to be declared as well--><resource name="Magento_Customer::customer" ?-->
		<!-- To grant permission to Magento_Sales::reorder, all its parent resources need to be declared-->
		<!-- to grant permission to Magento_Catalog::products, all its parent resources need to be declared -->

    Code language: HTML, XML (xml)
Define the integration
Your module can optionally provide values in the configuration file so that the integration can be automatically pre-configured with default values. To enable this feature, update the config.xml file in the etc/integration directory.
hexasync@beehexa.comCode language: CSS (css)Install the module to run the setup scripts
After that, run the commands those you must be familiar with for installing the module and having the setup script create an integration for you.
bin/magento setup:upgrade
bin/magento setup:di:compile
bin/magento cache:clean
And here is the output when we visit Systems -> Extensions -> Integrations

Click on the integration, we can see the detail as we configured in the etc/integration/config.xml
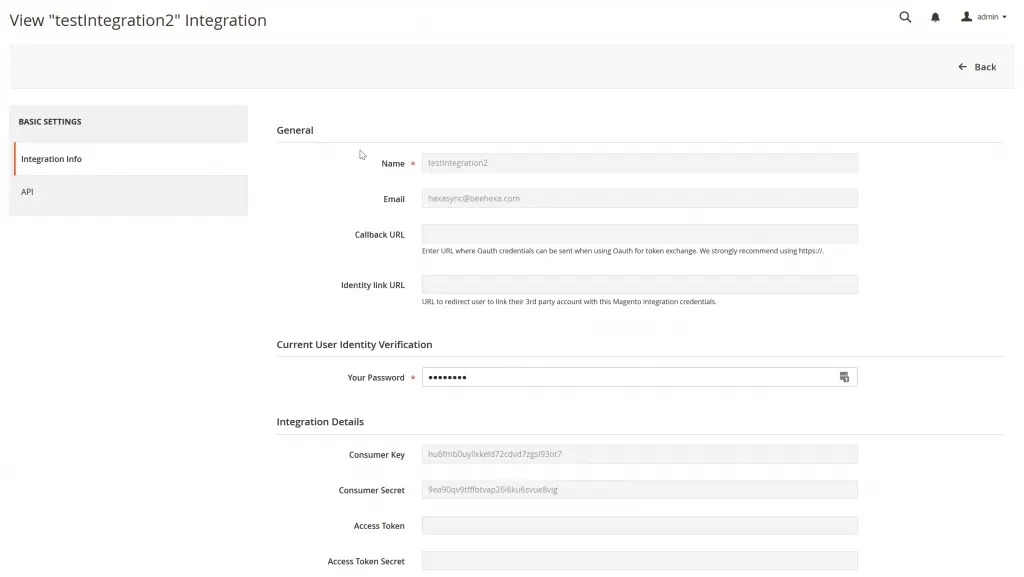
and API resources granted to the testIntegration2 as we created in our etc/integration/api.xml

If you activate Test Integration 2, your external application can start accessing the resources we configured, as in the picture above. The way it works is similar to what we did with the integration we created manually above.
There is an important part of working with Magento integration in understanding how Magento and the external application handle OAuth communications, but that will be the subject of another post. I hope my blog helps you clearly understand What Magento Integration is and the 2 ways you can create it.


